> For the complete documentation index, see [llms.txt](https://wiki.inels.com/llms.txt). Markdown versions of documentation pages are available by appending `.md` to page URLs; this page is available as [Markdown](https://wiki.inels.com/intercom/intercom-cloud/user-manual-1/reseller-installer.md).
# Reseller/Installer
### Home page
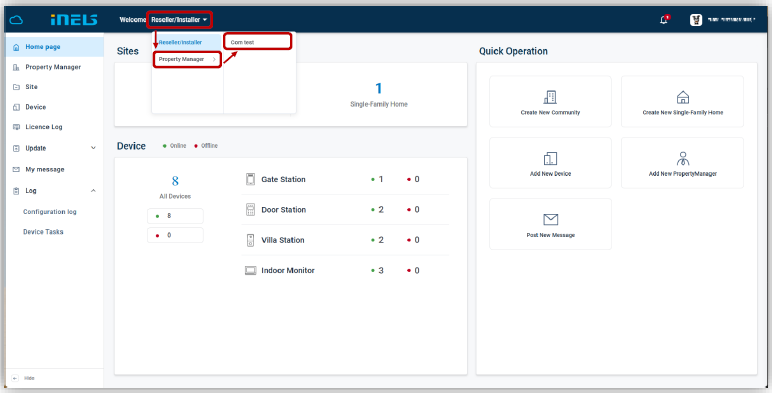
Here is the dashboard for tracking the number of sites and devices. Also, the quick operation to create a new Community, a new Single-family home, etc.
### Property Manager
#### Add a Property Manager Account
Here are the steps to add a property manager account:
\
Step 1: Go to the Property Manager column and click Add to add a property manager account.
Step 2: Fill in the property manager’s information. Company name, Email and language are necessary. Please make sure the email is right because the email will be the property manager’s account. And the password will be sent to this email address.
#### Manage Property Manager Account
After registering a property manager account, you can edit, delete, check it, and resend the registration email
### Site
#### Add a Community
Here are the steps to add a community:
\
Step 1: Go to the Site column and click New Community to add a new community.
Step 2: Fill in community information. Community name and Country/Region are necessary.
\
Click More to manage additional permissions for the site, or manage them later by selecting Edit under the Operation option on the Site page.
**Resident Permissions**
In this section, you can manage resident permissions, including registering Face ID and accounts in the app, as well as creating temporary keys.
a) Residents Register Face ID: It is the face recognition function. If you have a Door Station with face recognition, you can enable it so app users can upload their face data via the app.
b) Residents Register Account: It is used to determine whether residents have permission to create an account in the APP.
c) Residents Create Temp Key:It is used to configure whether residents have permission to create temp keys in the APP. If enabled, residents can create temp keys in the APP for visitor access.
**Access Control Permission**
In this section, you can manage Access Control Permissions, including Config Private Devices on the Platform and Allow Offline Devices to Verify QR Codes.
a) Config Private Devices on the Platform: It is used to configure whether the property manager is allowed to manage Villa Station as an access control device.
* If enabled, the property manager will see the device when creating access control.
* If disabled, the property manager will not have permission to create access control for Villa Station.
b) Allow Offline Devices to Verify QR Code: It is used to configure whether the QR code can still be used to unlock the device after it goes offline.
* If enabled, the QR code can still be used to unlock the device after it goes offline. Please note that if the device goes offline, a new unlock QR code cannot be created for this device.
**Remote management:**
It is used to configure whether the property manager is allowed to manage Villa Station as an access control device. If enabled, the property manager will see the device when creating access control. If disabled, the property manager will not have permission to create access control for Villa Station.
**Sync Resident to Phonebook by default**:
It's used to configure whether "Sync to Phonebook on device" is enabled on the resident setting page of this site. If enabled, "Sync to Phonebook on device" will be enabled by default. Otherwise, it will be disabled by default.
**Report Device Anomalies**: It is used to configure whether to send a report to the administrator when an abnormality occurs on the device.
#### Manage Community
After creating a community, you can edit, delete, check it, and auto deploy log, or click the Site Management icon or the name of the community to jump to the Site Management page to manage devices, apartments, and residents of this community.
#### **License Management**
The license is necessary for the residents to use the app. Every iNELS app host user needs one license to get access to the app service. You can find different types of services in section 1.3.2.
\
As a reseller/installer, you are allowed to increase or reduce the amounts of different types of services for sites.
#### Device and Resident Management
\
Within the left - side Community classification module, users can add "New Building" to enter basic information of newly added buildings and "Public Areas" to manage shared space information, including the main entrance, laundry room, delivery room, and parking lot.
\
Here are the steps to create a community:
\
Step 1: Click New Public Area to create a new public area or directly rename the existing public area. Then click the Public Area you’ve created to manage the devices inside.
Step 2: Click Add Device, then select or fill in the device's basic information like device type, MAC address, and device name, etc. Then click save to finish it.
Step 3: Go back to the site management page and click New building to add a new building. Then select the building number and fill in the building name.
Step 4: Click the building you’ve created and click Add Apartment to add a new apartment. Apartment number and license selection are necessary when creating a new apartment.
\
Step 5: You can select to add a new resident on the same page.
{% hint style="info" %}
Without Indoor Monitor license, it must be selected when there is no indoor monitor online on the cloud, and that With Indoor Monitor license, it should be chosen when there is an indoor monitor available. For scenarios involving no calls, such as learning or testing purposes, "Not use" can be selected. Once a license with or without indoor monitor is selected, the choice cannot be modified. If modification is required, the original apartment (apt) must be deleted and re-added. However, deleting the apartment will result in the removal of all residents within the corresponding room.
{% endhint %}
Step 6: Click Device, then Add Device to add a new device.
{% hint style="info" %}
Noted: Indoor Monitor can receive calls via SIP Server The indoor monitor support received the call via the local network and the SIP server. The benefit of the SIP Server is that the door station and indoor monitor support public network calling, allowing communication between devices even when they are not within the same local area network (LAN). Devices can operate across different networks, providing greater deployment options.
{% endhint %}
Step 7: Click Resident, then Add Resident to add a new resident
{% hint style="info" %}
Noted: The cloud platform now supports using a single email account to join multiple households. The same account can act as the owner or a family member in up to 20 different households.
\
Additionally, a single email account can serve both as a household owner or member and as a community property manager at the same time.
{% endhint %}
#### QR Code for Tenant Self-Registration
The system supports generating a unique QR code for Apartment. By simply scanning the QR code, tenants can independently complete the APP registration, bind their resident information, and associate with the devices—without
\
requiring the property manager to manually enter email addresses or create accounts.
#### Landline
This feature is not supported. Once selected, can’t be cancelled and monthly fee must be paid.
#### Add a Single-Family
Here are the steps to create a Single-Family:
\
Step 1: Click Single-Family, then New Single-Family to add a new Single-family.
Step 2: Click Single-Family, then New Single-Family to add a new Single-family. Name, country/region, and license selection are necessary. You can select to add a device to this site on the same page.
Step 3: Click Device, then Add Device to add a new device to this site.
Step 4: Click Resident, then Add Resident to add a new resident.
**Report Device Anomalies**
\
It is used to send a report to the administrator’s email when an abnormality occurs on the device.
### Device
#### Add Device
**Add in Batch**
\
Here are the steps to add devices in batch:
\
Step 1: Go to the Device column and click Import Device Bottom.
Step 2: After clicking Import Device, select filler template and click Import to upload the completed template
{% hint style="info" %}
Noted: Indoor Monitor can receive calls via SIP Server
\
The indoor monitor support received the call via the local network and SIP server. The benefit of the SIP Server is that
\
the door station and indoor monitor support public network calling, allowing communication between devices even
\
when they are not within the same local area network (LAN). Devices can operate across different networks, providing
\
greater deployment options.
{% endhint %}
**Add One by One**
Step 1: Go to the Device column and click Add Device to add a device.
\
Step 2: Select the site and fill in the device’s information. Device Type, MAC address, device number, and device name should be filled in or chosen according to your device and needs. All of the other settings will be synced to your device.
{% hint style="info" %}
Noted: When adding devices to Community, the Applying Area option allows you to specify whether the device is Private or Public.
* Private: The device cannot be added to the Access Rule by the property manager. It will not appear in the device list under Access Rule.
* Public: Vice versa.
{% endhint %}
**Automatic Device Deployment to the Cloud Platform**
Step 1: Create a project on the cloud platform. For detailed instructions, refer to section 5.3.1.
\
Step 2: Enter the Site ID in the designated field and enable "Automatic Deployment" by toggling the switch. Then, fill in the Building No, Unit No, and Room No fields accordingly.
**Replace Device**
\
It’s only supported to replace a device with the same model.
\
Here are the steps to replace a device:
\
Step 1: Go to the Device column and click Replace Device to replace this device.
Step 2: Fill in the MAC address of the new same-model device. You can also change its network.
Step 3: The platform will check the status of the device.
Step 4: After that, the data will be transferred to the new one.
#### Access Device Webserver
Here are the steps to access the device web server:
\
Step 1: Make sure the device firmware is the latest with remote service.
\
Step 2: Visit the device’s config page with its IP address locally. The default account is admin, and the password is 123456.
\
Step 3: Go to System > Remote Access to allow this feature.
Step 4: Go back to the cloud platform’s Device > More > Access Device Webserver
Step 5: Click Open to browse. The device web server will open in a new window. Access will remain valid for 30 minutes.
#### Device Relay Setting
Step 1: Go to the Device column and click More > Relay Setting behind the device to configure the relay.
Step 2: Select the replays you need and configure the relay and dry contact by yourself. When residents log in to iNELS App and click the unlocking button of the entrance device, relays with inactive status in the relay list will be hidden. When there is only one relay in an "active" state on the entrance device, clicking the unlocking button will skip the relay list selection and directly unlock the door.
#### Reboot the Device.
Step 1: Go to the Device column and click More > Reboot behind the device to configure the relay.
#### Enable Daylight Saving Time
Step 1: Click More, then Edit.
Step 2: Enable daylight saving time.
### License Log
You can check the number of licenses you have and the license log.
### Update-Firmware List (OTA)
{% hint style="info" %}
Note: Functionality is under development and will be available soon.
{% endhint %}
Choose the corresponding Device Type, Model, and Firmware Version according to the device. After choosing, the devices can be selected to upgrade, and Upgrade Time can also be set.
### Update-Upgrade Log (OTA)
The log of the upgrade.
### My Message
#### Send Messages to Property Manager
Here are the steps to send messages to the property manager:
\
Step 1: Go to the My message column and click Add to edit a message
Step 2: Fill in the message title and message content. Choose the recipient and the delivery time.
Step 3: Click the message. You can check the message details.
### Log
#### Configuration Log
You can check the configuration logs of this community’s devices. You can view the records for recent one month
#### Device Tasks
Here, records operation logs related to device management, including deletion and replacement activities, ensuring traceability and accountability.
### Switch to Property Manager
Please make sure you’ve linked the project to this Reseller/Installer account when creating it. After doing so, you may find you can switch to manage the project in the upper right corner. You can also switch back to Reseller/Installer.
{% hint style="info" %}
Noted: In our system, a site can be defined as a single-family house or a community. A single-family house normally does not have property management, which means it cannot be managed under a property management account. By contrast, a community site is managed by a property manager, so when we switch to the property management account, only community sites can be managed.
{% endhint %}
### Technical Supporter
Here are the steps to create a contact for the Property Manager to seek technical support.
\
Step 1: Go to Account > Technical Supporter.
Step 2: Fill in the information about technical support.